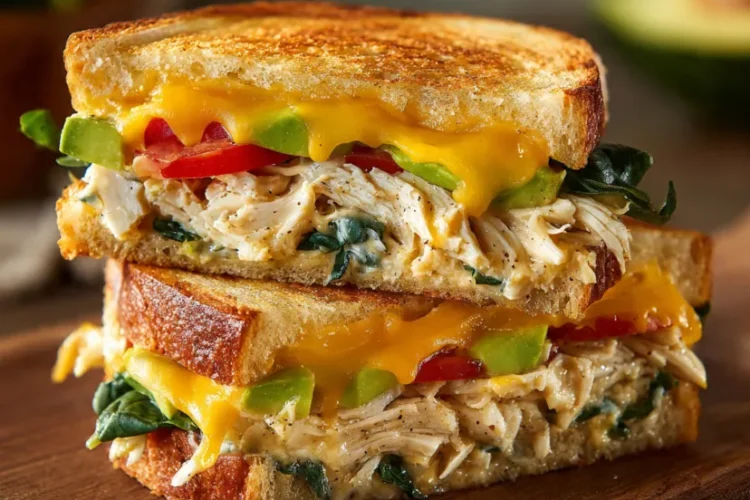
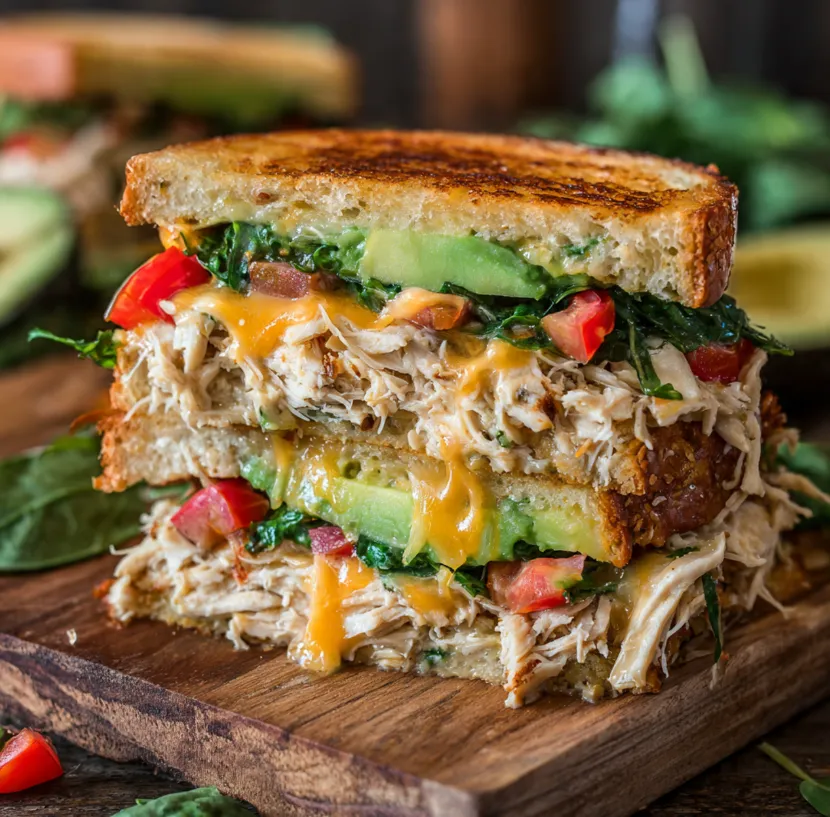
Imagine biting into a sandwich where creamy, cool avocado meets tender, savory chicken and molten, stretchy cheese, all hugged by perfectly toasted bread. The Chicken Avocado Melt isn’t just a sandwich; it’s a symphony of textures and flavors that transforms a simple lunch into a gourmet experience. It’s quick enough for a busy weekday yet impressive enough for a weekend treat. This recipe is your foolproof guide to creating a café-quality sandwich right in your own kitchen, using simple ingredients and techniques. Let’s make a sandwich so good, you’ll never look at lunch the same way again.
Why You’ll Love This Chicken Avocado Melt Sandwich
This recipe is a winner for so many reasons. It’s incredibly customizable use leftover rotisserie chicken or grilled chicken breasts. It’s packed with nutrients from lean protein, healthy fats, and fresh vegetables. Most importantly, it comes together in about 15 minutes, making it the perfect solution for a satisfying meal without the hassle. The combination of hot, crispy bread and cool, creamy avocado is simply magical.
Chicken Avocado Melt Ingredients List
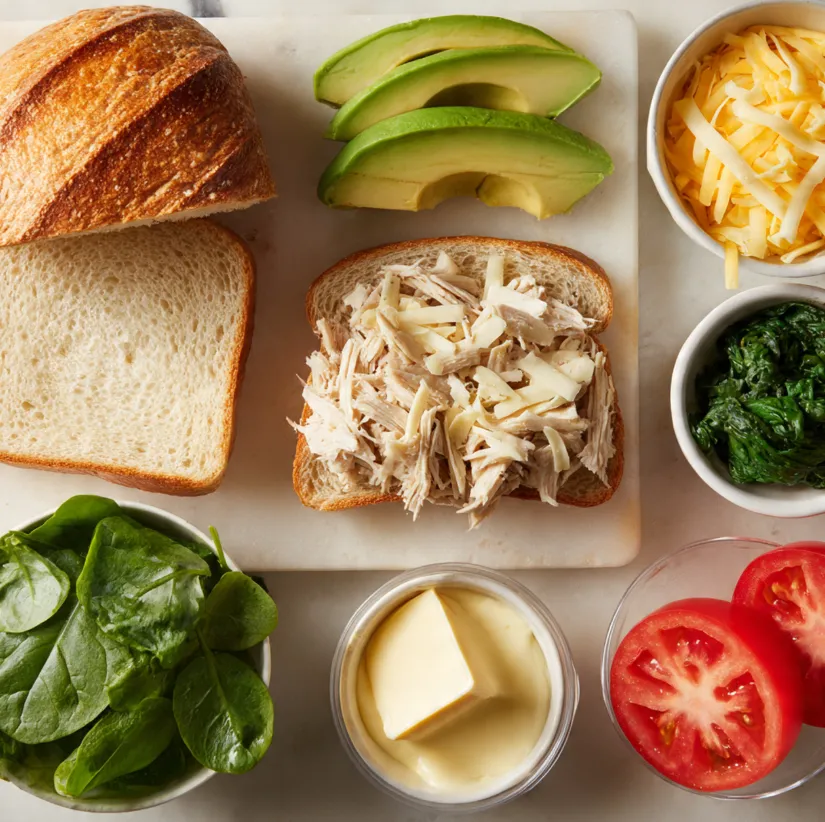
Here’s everything you need to make two generous sandwiches. This list is easy to scale up or down.
For the Sandwich:
- 4 slices of artisan bread (sourdough, ciabatta, or a thick multigrain work best)
- 1 large ripe avocado
- 1 cup cooked chicken breast, shredded or diced (about 1 large breast)
- 4 slices of medium cheddar cheese (or pepper jack for a kick)
- 4-6 leaves of fresh spinach or lettuce
- 4 slices of tomato
- 2 tablespoons mayonnaise
- 1 tablespoon butter, softened (or olive oil)
- Salt and black pepper to taste
Optional Add-ins for Extra Flavor:
- 1 tablespoon finely chopped red onion or cilantro
- A squeeze of fresh lime juice over the avocado
- A pinch of garlic powder or smoked paprika in the chicken
- A thin spread of Dijon mustard or pesto on the bread
Step-by-Step Preparation Guide
Follow these simple steps for the perfect melt every single time.
Step 1: Prepare Your Ingredients
Gather all your ingredients. This “mise en place” makes the cooking process smooth and quick. Shred your cooked chicken, slice the tomato, wash the spinach, and have your cheese ready. Pro Tip: If your chicken is plain, toss it with a tiny pinch of salt, pepper, and garlic powder for extra flavor.
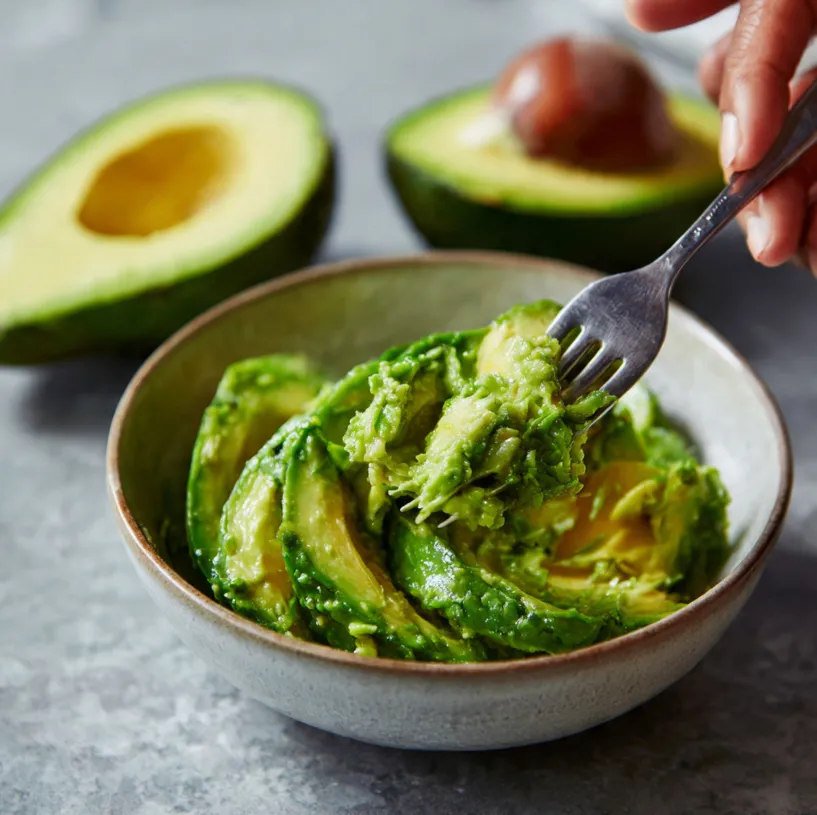
Step 2: Mash the Avocado
Cut the avocado in half, remove the pit, and scoop the flesh into a small bowl. Mash it with a fork to your desired consistency some prefer it chunky, others smooth. Season with a pinch of salt and pepper (and a squeeze of lime juice if using). Set aside.
Step 3: Assemble the Sandwiches
Lay out your four bread slices. Spread mayonnaise lightly on one side of each slice (this will be the inside of the sandwich). Flip two slices over. On these two slices (mayonnaise-side up), build your layers in this order:
- Cheese Slice: Place one slice of cheese directly on the bread. This creates a protective layer that helps prevent the bread from getting soggy from the avocado.
- Shredded Chicken: Divide the chicken evenly between the two slices, piling it on top of the cheese.
- Second Cheese Slice: Add another slice of cheese on top of the chicken. This double-cheese method ensures maximum meltiness!
- Avocado & Veggies: On the other two bread slices (the ones with mayonnaise facing down), spread the mashed avocado evenly. Top the avocado with spinach leaves and tomato slices.
- Combine: Carefully place the avocado-veggie slice on top of the chicken-cheese stack, avocado-side facing in. You now have two complete, un-toasted sandwiches.
Step 4: Toast to Perfection
Heat a large skillet or griddle over medium-low heat. Spread the outside of each sandwich (the top and bottom bread faces) lightly with softened butter or brush with olive oil.
Place the sandwiches in the preheated pan. Cook for 3-4 minutes on the first side, covered with a lid or large metal bowl, until the bottom is golden brown and the cheese begins to melt. The cover is crucial—it traps heat and ensures the filling gets warm and the cheese melts completely.
Carefully flip the sandwiches using a spatula. Press down gently. Cook for another 3-4 minutes on the second side, covered again, until golden brown and the cheese is visibly oozy.
Step 5: Serve and Enjoy!
Remove the sandwiches from the pan and let them rest for 1 minute (this allows the cheese to set slightly so it doesn’t all gush out on the first bite). Slice in half diagonally for the best presentation. Serve immediately while hot and crispy.
Useful Tips for the Best Sandwich Ever
- Choosing Avocado: Use an avocado that is slightly soft to the touch but not mushy. If it’s too hard, it won’t mash well; too soft, and it can be messy.
- Bread Matters: Use sturdy, thick-sliced bread. Thin sandwich bread can become soggy or fall apart under the weight of the fillings.
- Chicken Shortcut: A store-bought rotisserie chicken is the ultimate time-saver. Shred the breast meat for this recipe.
- Control the Heat: Cooking over medium-low heat allows the bread to toast to a perfect golden brown without burning before the cheese has a chance to melt.
- Customize It!
- Spicy Lovers: Use pepper jack cheese and add a few slices of jalapeño.
- Bacon Boost: Add 2 slices of crispy cooked bacon to each sandwich.
- Herbaceous Twist: Mix chopped cilantro or basil into the mashed avocado.
Conclusion: Your New Go-To Lunch Awaits
The Chicken Avocado Melt Sandwich is more than just a recipe; it’s a template for delicious, quick, and satisfying meals. With its perfect balance of creamy, savory, crunchy, and fresh elements, it’s guaranteed to become a household favorite. It proves that you don’t need complicated techniques or exotic ingredients to create something truly special.
So, what are you waiting for? Head to your kitchen, grab these simple ingredients, and give this recipe a try. We promise, the first bite of that warm, cheesy, avocado-filled goodness will make all the difference. Don’t forget to share your creation and tag us we love seeing your culinary masterpieces! Happy cooking