A Match Made in Dessert Heaven
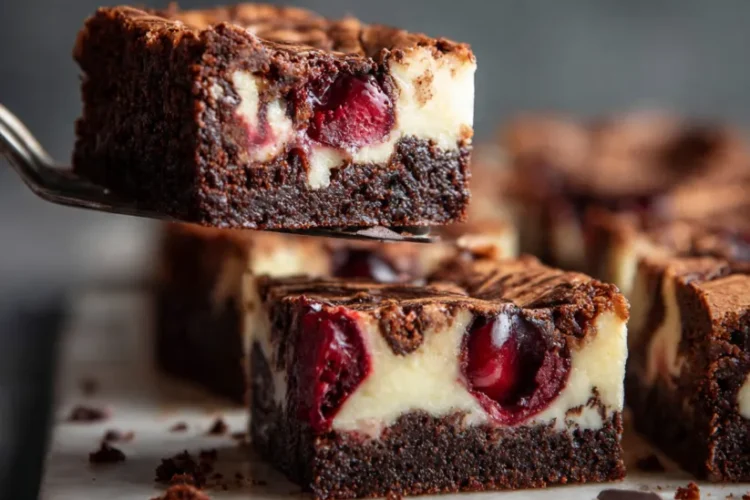
Imagine the deepest, richest, fudgiest brownie you’ve ever tasted. Now, envision a layer of velvety, tangy cheesecake swirled through it, dotted with bursts of sweet cherry flavor. That’s the magic of Cherry Cheesecake Brownies. This dessert isn’t just a treat; it’s an experience. It combines two classic favorites into one stunning, marbled masterpiece that’s guaranteed to impress at potlucks, family gatherings, or as a special weekend baking project. While they look like they came from a professional bakery, this recipe is deceptively simple. Whether you’re a baking novice or a seasoned pro, this guide will walk you through every step to create these rich, swirled dessert favorites that are sure to become a regular in your recipe rotation. Let’s preheat that oven and dive into the world of indulgent, swirled bliss.

Everything You’ll Need: The Cherry Cheesecake Brownies Ingredients List
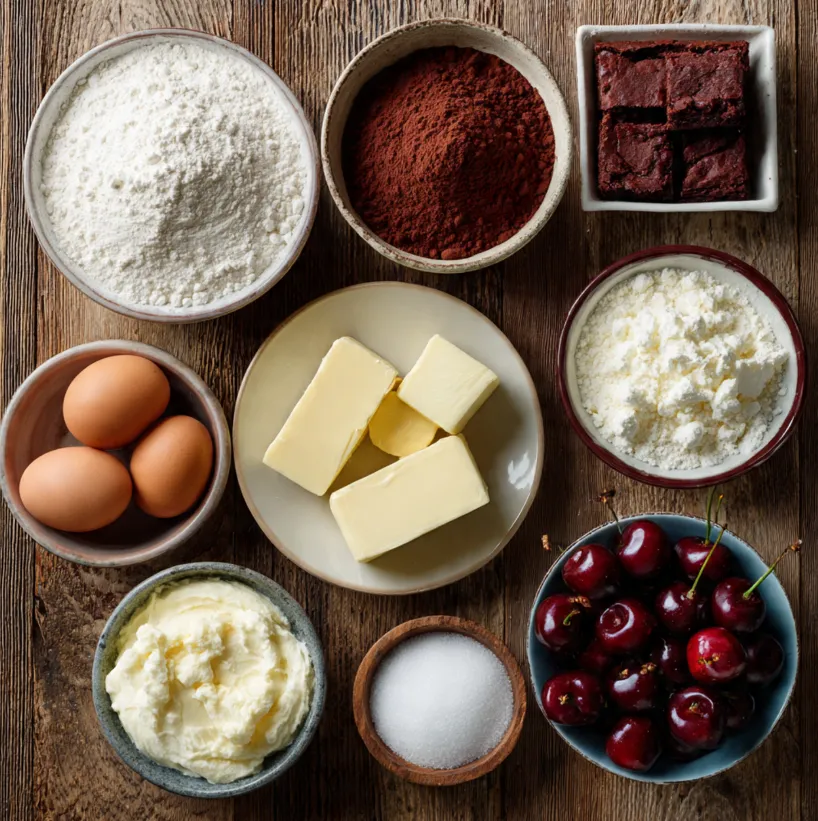
Gathering your ingredients is the first step to success. For best results, ensure all dairy ingredients (cream cheese, eggs, butter) are at room temperature. This allows for smoother mixing and a more uniform batter.
For the Fudgy Brownie Layer:
- 1 cup (225g) unsalted butter
- 1 ¼ cups (250g) granulated sugar
- ¾ cup (150g) packed light brown sugar
- 4 large eggs, at room temperature
- 1 tablespoon pure vanilla extract
- 1 cup (125g) all-purpose flour
- 1 cup (85g) unsweetened cocoa powder (high-quality is best!)
- ½ teaspoon salt
- 1 cup (175g) semi-sweet chocolate chips
For the Cherry Cheesecake Swirl:
- 16 ounces (450g) full-fat brick cream cheese, softened
- ⅔ cup (135g) granulated sugar
- 2 large eggs, at room temperature
- 1 teaspoon pure vanilla extract
- ⅔ cup (about 100g) chopped cherries (fresh pitted, frozen thawed & drained, or well-drained jarred Morello cherries)
- A few drops of red food coloring (optional, for a more vibrant swirl)
Step-by-Step Baking Instructions: Creating the Swirl Magic
Follow these numbered steps carefully for perfect, layered results.
Step 1: Preparing Your Pan and Oven
- Preheat your oven to 350°F (175°C). This is crucial for even baking.
- Line a 9×13 inch baking pan with parchment paper, leaving an overhang on two sides. This “sling” will make it incredibly easy to lift the entire batch of brownies out for clean slicing. Lightly grease the exposed parts of the pan.
Step 2: Making the Fudgy Brownie Batter
- In a medium saucepan over low heat, melt the butter completely. Remove from heat.
- Whisk both the white and brown sugars into the warm butter until well combined.
- Add the 4 eggs, one at a time, whisking well after each addition. Then, whisk in the 1 tablespoon of vanilla. The mixture should be smooth and glossy.
- Sift in the flour, cocoa powder, and salt. This step prevents lumps and ensures a fine texture. Gently fold the dry ingredients into the wet mixture using a spatula until just combined do not overmix.
- Fold in the chocolate chips. Set this rich brownie batter aside.
Step 3: Preparing the Cherry Cheesecake Swirl
- In a large bowl, using a hand mixer or stand mixer fitted with the paddle attachment, beat the softened cream cheese on medium speed until completely smooth and creamy (about 2 minutes).
- Add the ⅔ cup of sugar and beat until fully incorporated and smooth.
- Beat in the 2 eggs, one at a time, followed by the 1 teaspoon of vanilla. Scrape down the sides of the bowl as needed.
- Gently fold in the chopped cherries. If using, add a few drops of red food coloring now for a pinker cheesecake layer.
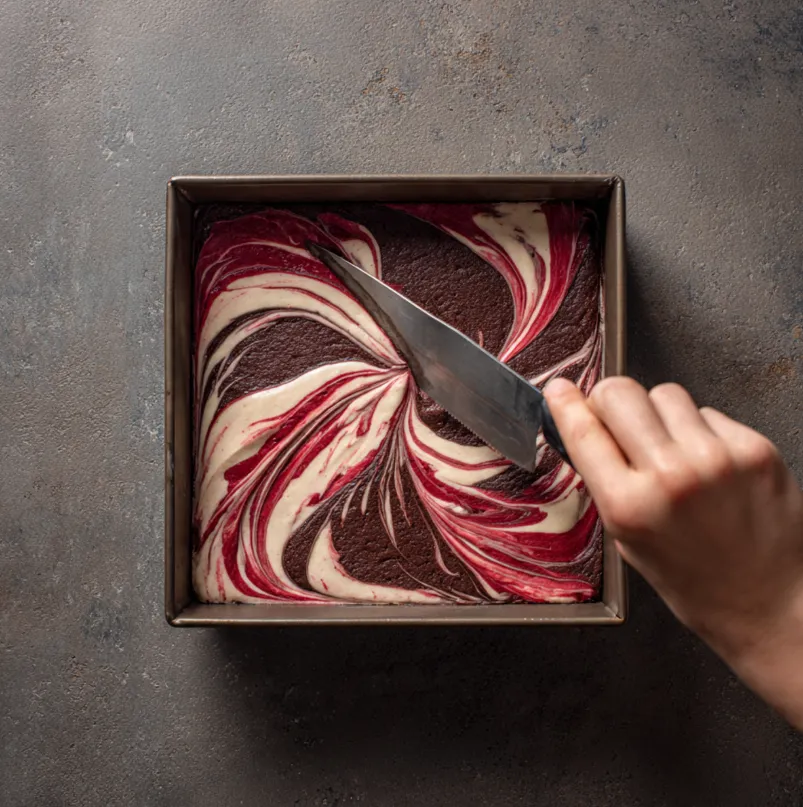
Step 4: Layering and Swirling
- Pour about two-thirds of the brownie batter into your prepared pan. Use a spatula to spread it into an even layer.
- Dollop all of the cherry cheesecake mixture over the brownie layer. Spread it carefully into a relatively even layer, trying not to disturb the brownie base too much.
- Dollop the remaining brownie batter over the cheesecake layer in random spoonfuls.
- The Fun Part: Take a dull knife or a skewer. Drag it through the layers in a zig-zag, up-and-down, and swirling motion to create beautiful marbled patterns. Don’t overdo it—just 5-7 passes is perfect.
Step 5: Baking and Cooling (The Key to Perfect Texture)
- Bake for 45-55 minutes. The brownies are done when the edges are set, and the center has a slight, gentle jiggle (not a liquid wobble). A toothpick inserted into a brownie section (not the cheesecake swirl) should come out with a few moist crumbs.
- Place the pan on a wire rack and let the brownies cool completely to room temperature. This is non-negotiable for clean slicing.
- For the best, cleanest cuts, cover the cooled pan and refrigerate for at least 3-4 hours, or ideally overnight. This sets the cheesecake layer perfectly.
Pro Baker Tips for Perfect Cherry Cheesecake Brownies
- Room Temperature is King: This cannot be stressed enough. Room-temperature cream cheese, eggs, and butter blend seamlessly, preventing a lumpy cheesecake layer or a curdled batter.
- Cherry Choices: You can use fresh, frozen (thaw and pat VERY dry), or jarred cherries in syrup (drain and pat VERY dry). For a stronger flavor, consider adding ¼ teaspoon of almond extract to the cheesecake layer.
- Don’t Overbake: The slight jiggle in the center is your friend. The residual heat will continue to cook them as they cool, yielding a fudgy, not cakey, brownie.
- The Chill Factor: Slicing cold brownies with a hot knife (run your knife under hot water and dry it between cuts) gives you stunning, professional-looking slices with clean layers.
- Storage: Keep these brownies covered in the refrigerator for up to 5 days. They can also be frozen for up to 3 months. Thaw overnight in the fridge before serving.
Conclusion: Your Turn to Create a Masterpiece!
There you have it—the complete guide to baking incredible, show-stopping Cherry Cheesecake Brownies. This recipe perfectly balances the intense chocolatey depth of a brownie with the creamy, tangy sweetness of cherry cheesecake. The visual appeal of the swirl makes them as beautiful as they are delicious.
Don’t be intimidated by the two layers; the process is straightforward and incredibly rewarding. The look of delight on your friends’ and family’s faces will be worth every minute. So, tie on your apron, gather those ingredients, and get ready to bake what might just become your new signature dessert. Happy baking—and don’t forget to share a photo of your gorgeous swirls!